
Scanning a document used to mean staring at a progress bar, hunting through folders for the output file, and then manually uploading it to wherever you actually needed it. That era is largely over. Epson ScanSmart has evolved into a capable scanning hub that connects your physical scanner directly to the cloud services and productivity tools that drive your daily work. In this guide, we explore everything you need to know to build a genuinely paperless scanning workflow using Epson ScanSmart — from first installation to an automated, scan-to-cloud process that practically runs itself.
What Makes Epson ScanSmart Different From Basic Scanning Software
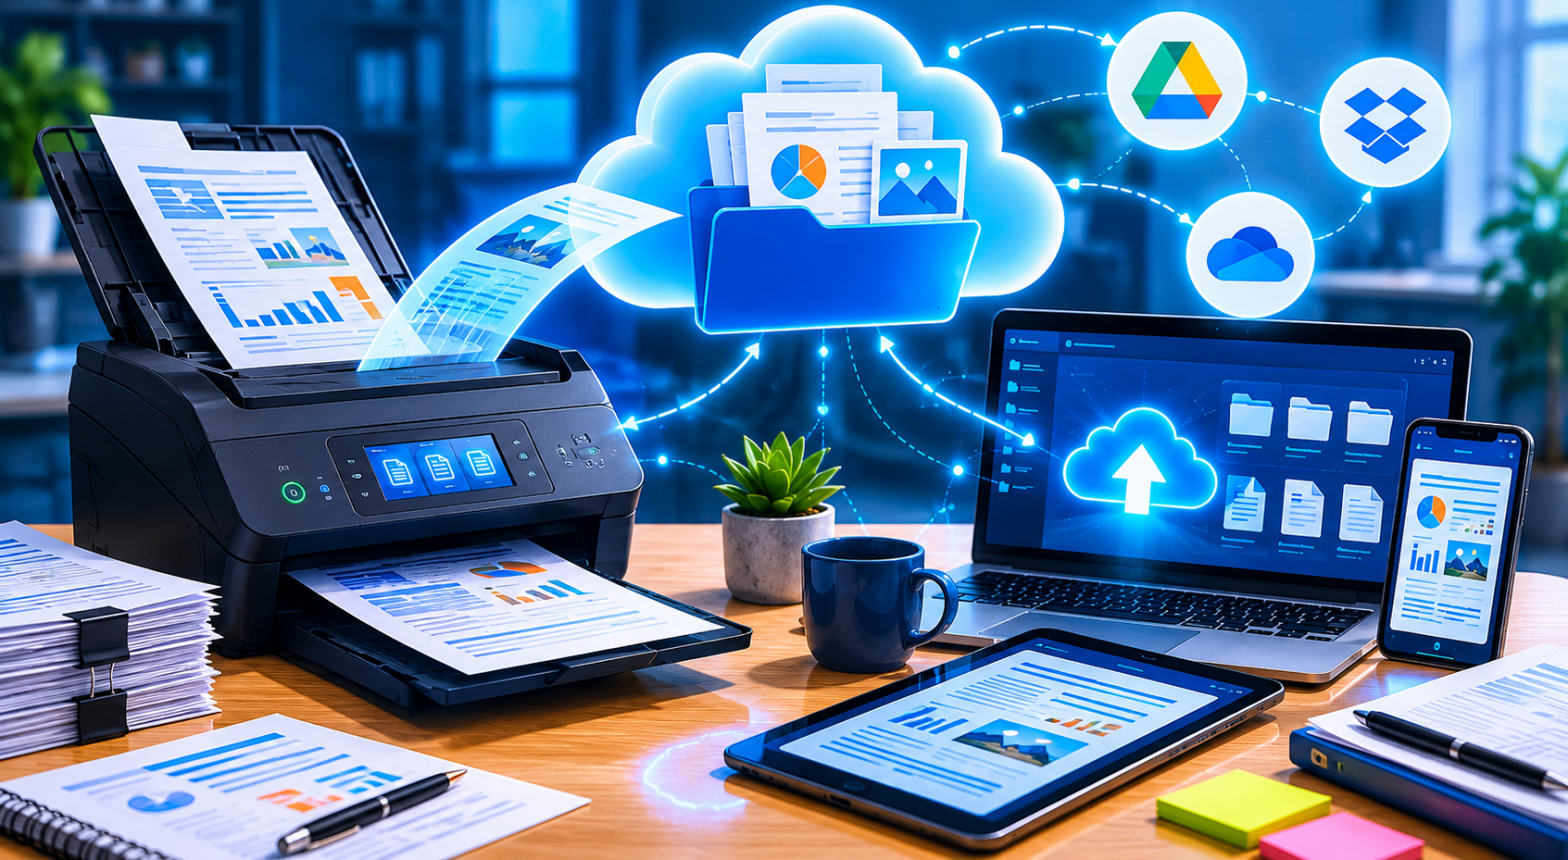
Most scanning software does one thing: it receives an image from your scanner and saves it as a file on your hard drive. Epson ScanSmart goes considerably further. It bundles several capabilities that would otherwise require separate tools: automated document feeding, integrated OCR (optical character recognition) powered by Kofax OmniPage technology, one-click upload to cloud services, and intelligent file naming. Rather than treating a scan as the end of a process, ScanSmart treats it as the beginning of a workflow.
The latest version for Windows (3.7.20) and Mac (3.7.21) supports the full range of Epson’s ES scanner line and most modern Epson multifunction printers. If you own an Epson device and are not yet using ScanSmart, you are likely leaving significant efficiency gains on the table.
Before ScanSmart can function, two supporting applications need to be installed: Epson Scan 2 (which provides the low-level scanner driver interface) and Epson Event Manager (which handles button-triggered scans from the device’s physical control panel). Once those are in place, ScanSmart serves as the user-facing layer that ties everything together.
Installation: Getting ScanSmart Ready in Under Ten Minutes
Download and Prerequisites
Navigate to epsonscansmart.org and download the ScanSmart installer for your operating system. Before running it, make sure you also have Epson Scan 2 and Epson Event Manager installed. If you are unsure whether these are present on your system, the ScanSmart installer will usually detect and prompt you to install them if they are missing.
For Windows users, the process is:
- Run the ScanSmart installer executable.
- Follow the on-screen wizard, accepting the license agreement.
- Allow the installer to detect your connected Epson device.
- Complete installation and restart your PC if prompted.
For Mac users, mount the downloaded disk image and run the installer package, following the same general steps.
First Launch and Scanner Detection
When you open Epson ScanSmart for the first time, it will scan your system for connected Epson devices. If your scanner or multifunction printer is connected via USB or is on the same Wi-Fi network, it should appear automatically. Select your device and click OK to proceed to the main interface.
If ScanSmart does not detect your device, check that Epson Scan 2 is installed and that your printer driver is current. The most common cause of non-detection is an outdated or missing driver rather than a problem with ScanSmart itself.
Understanding the ScanSmart Interface
The main ScanSmart window is intentionally simple. There is a large Scan button in the center, a preview panel on the right, and a row of action buttons along the bottom that become active after you complete a scan. These action buttons are where the real power lives.
After a scan completes, ScanSmart presents you with a preview of the scanned document and offers options to:
- Rotate individual pages
- Delete unwanted pages
- Reorder pages within a multi-page document
- Save to your local computer
- Send to email
- Upload to cloud services such as Google Drive, Dropbox, Evernote, SharePoint, and others
- Create editable documents using OCR (converting scanned text to editable Word or Excel files)
This post-scan workflow is what separates ScanSmart from a basic “scan and dump” approach.
Setting Up Cloud Destinations
Cloud integration is one of ScanSmart’s most compelling features for users building a paperless office. Here is how to connect the most popular services.
Google Drive
- In ScanSmart, click the Settings icon (gear symbol) in the top right.
- Navigate to Cloud Services or Upload Destinations.
- Select Google Drive and click Sign In.
- A browser window will open prompting you to log in to your Google account and grant ScanSmart permission to access your Drive.
- Once authorized, you can specify a default folder within Google Drive where scans will be uploaded.
- From this point forward, after any scan, you can click the Google Drive upload button to send the document directly to your designated folder.
Dropbox
The Dropbox integration follows the same pattern. Navigate to Settings > Cloud Services > Dropbox, click Sign In, authenticate, and specify your target folder. Dropbox is particularly useful for teams that share a single Dropbox Business account, as everyone can access scanned documents from a shared folder in real time.
Microsoft SharePoint and OneDrive
For organizations using Microsoft 365, connecting ScanSmart to SharePoint or OneDrive brings scanned documents directly into your organization’s document management system. The setup requires your Microsoft 365 credentials and appropriate permissions within your SharePoint instance.
Evernote
Evernote’s integration with ScanSmart is a favorite among users who want to maintain a digital notebook of receipts, business cards, meeting notes, and reference documents. Connect your Evernote account and select a default notebook for incoming scans. ScanSmart’s OCR can make the text in these scanned notes fully searchable within Evernote.
Using OCR: Turning Paper Into Searchable, Editable Text
The built-in Kofax OmniPage OCR engine is one of ScanSmart’s most valuable features. OCR — optical character recognition — analyzes the pixels in your scanned image and converts them into actual text characters that a computer can read, search, and edit.
When to Use OCR
OCR is most useful when you:
- Need to search for a specific word or phrase within a large batch of scanned documents
- Want to copy text from a scanned document into another application
- Are creating editable versions of contracts, reports, or forms that were originally paper-only
- Want scanned PDFs to be indexed by document management systems or cloud search
How to Enable OCR in ScanSmart
After completing a scan:
- Click Save in the action bar at the bottom of the ScanSmart window.
- In the save dialog, look for the Create Searchable PDF or Save as Editable Text option.
- Select your preferred output format. Options typically include searchable PDF (the original layout is preserved, but text is embedded and searchable), Word document (the text is extracted and placed in a .docx file), and Excel spreadsheet (useful for scanning tables and data grids).
- Choose your save location or cloud destination and click Save.
For the best OCR accuracy, scan at 300 DPI or higher, use the document feeder to keep pages flat, and ensure your originals are not excessively crumpled or faded. ScanSmart and OmniPage handle most common document types reliably, but very small fonts (below 8pt), handwriting, and low-contrast documents may produce less accurate results.
Building an Automated Scanning Workflow
Once you have cloud destinations configured and OCR working, you can design a workflow that handles the routine scanning tasks with minimal manual intervention.
Profile-Based Scanning
ScanSmart allows you to save scan settings as profiles. A profile captures your preferred resolution, color mode, file format, OCR setting, and destination in a single preset. You might create:
- A Receipts profile: 200 DPI, black and white, searchable PDF, uploads automatically to a “Receipts 2026” folder in Google Drive.
- A Contracts profile: 300 DPI, color, searchable PDF, uploads to SharePoint.
- A Photos profile: 600 DPI, full color, saved as JPEG to a local folder.
To create a profile, configure your settings and click Save Settings or look for the profile management area in ScanSmart’s settings panel. Naming your profiles clearly makes it easy to select the right one when you sit down to scan a batch of documents.
Button-Triggered Scanning via Epson Event Manager
One of the most convenient features of the Epson ecosystem is the ability to initiate a scan from your scanner’s physical button rather than from the computer. Epson Event Manager handles this link. Once configured, you can press the scan button on your device and have it automatically trigger ScanSmart with a pre-selected profile — no need to click anything on the computer.
To set this up:
- Open Epson Event Manager (separate from ScanSmart).
- Select your scanner’s scan button from the event list.
- Assign it to launch Epson ScanSmart with a specific profile.
- Save the settings.
Now pressing the button on your scanner will launch ScanSmart, apply your chosen profile, scan the document, and either show it for review or save it directly depending on your settings.
Organizing Scanned Documents: Naming Conventions and Folder Structures
Even with great scanning software, a paperless workflow falls apart if scanned documents land in a chaotic heap. Here are proven naming and organization strategies.
Date-Based Naming
Use a consistent date format as the prefix for all scanned files: YYYY-MM-DD_Description.pdf. For example: 2026-06-15_Electricity_Bill_May2026.pdf. The YYYY-MM-DD format ensures files sort chronologically in any file manager.
ScanSmart’s auto-naming feature can automatically prepend the current date to filenames based on your settings. Look for the File Name Settings option within ScanSmart to enable this.
Category-Based Folders
Create a logical folder structure in your cloud storage before you start scanning large volumes:
Documents/
├── Financial/
│   ├── Receipts/
│   ├── Bank Statements/
│   └── Tax Documents/
├── Medical/
├── Legal/
├── Home/
│   ├── Insurance/
│   └── Utilities/
└── Work/
Direct each ScanSmart profile to its corresponding folder, and maintenance becomes almost automatic.
Scanning Best Practices for Cleaner Output
The quality of your scanned documents depends heavily on how you use your scanner, not just the software settings. A few practical tips:
Clean the scanner glass regularly. Dust and smudges on the flatbed glass appear as artifacts in scans. Wipe the glass with a microfiber cloth before important scan sessions.
Use the automatic document feeder (ADF) for multi-page documents. The ADF handles batches far more efficiently than the flatbed, and ScanSmart can assemble multi-page PDFs automatically.
Choose the right resolution. For text documents, 200–300 DPI is sufficient and keeps file sizes manageable. For photographs or documents with fine detail, use 600 DPI or higher. Scanning everything at the maximum resolution is unnecessary and creates bloated files.
Straighten documents before feeding. Crooked pages result in skewed scans that look unprofessional and can reduce OCR accuracy. Most modern Epson scanners include automatic deskew, but physical straightening still helps.
Use color mode thoughtfully. Scanning text documents in black-and-white or grayscale rather than color reduces file size significantly without any meaningful quality loss for text-only content.
Troubleshooting Common ScanSmart Issues
ScanSmart Cannot Find My Scanner
Ensure that Epson Scan 2 is installed and that the scanner is powered on and connected. For network-connected scanners, confirm that the scanner and your computer are on the same Wi-Fi network. Restart both the scanner and the ScanSmart software and try again.
Cloud Upload Fails
Check your internet connection. If the connection is fine, try signing out of the cloud service within ScanSmart and signing back in to refresh the authentication token. Some organizations have firewall rules that block certain cloud services — if you are on a corporate network, consult your IT team.
OCR Output Is Inaccurate
Scan at a higher resolution (300 DPI minimum), ensure the original document is clean and flat, and check that the language setting in ScanSmart’s OCR options matches the language of the document you are scanning. Multi-language documents require a multi-language OCR configuration.
ScanSmart Is Slow
Large multi-page documents with OCR enabled are resource-intensive. Close other applications while scanning large batches, and consider breaking very long documents into smaller groups of 20–30 pages for faster processing.
Making the Most of ScanSmart in a Home Office or Small Business
For home office workers and small business owners, Epson ScanSmart bridges the gap between physical documents and digital workflows. The combination of reliable scanning hardware, intelligent software, cloud connectivity, and OCR creates a system where paper documents no longer pile up on desks waiting to be filed. Instead, every receipt, contract, invoice, and form can be digitized, organized, and made searchable within minutes of arrival.
In 2026, the expectation for document management is that things should be findable, shareable, and backed up. Epson ScanSmart, properly set up, delivers all three. Spend an afternoon configuring your profiles, cloud destinations, and folder structure, and you will have a paperless workflow that runs efficiently for years to come.